> ## Documentation Index
> Fetch the complete documentation index at: https://docs.retellai.com/llms.txt
> Use this file to discover all available pages before exploring further.
# Connect Salesforce
> Connect Salesforce to Retell AI with an External Client App: OAuth client credentials, the Run As user setup, and how to verify the connection works.
Connecting Salesforce takes an External Client App with the client credentials flow enabled and a Run As user. One connection covers both [contact sync](/integrations/salesforce-contact-sync) and [agent functions](/integrations/salesforce-functions): your agents work your Contacts, opportunities, and cases live, and Retell keeps the Contact records current. This page covers the Salesforce-side setup and the credentials Retell needs.
Retell authenticates with the **OAuth 2.0 client credentials flow**.
## When to use it
Connect Salesforce when Salesforce is your system of record and you want your agents to work from it without anyone copying data between tools. It's the right choice when you want to:
* **Call or text people who already exist in Salesforce.** Contacts sync into Retell automatically, so your agent greets callers by name and knows their account details instead of asking for them.
* **Keep Salesforce current without manual data entry.** Analysis results from each conversation (qualification status, stated preferences, a corrected email address) write back to the Contact record.
* **Give your sales team call history where they already work.** Each call and chat lands on the Contact's activity timeline as a Task, with the summary and duration.
* **Let the agent act on Salesforce directly.** [Integration tools](/integrations/salesforce-functions) identify the caller by number, read their opportunities and cases, create a Contact or Lead when a new caller comes in, run a SOQL query for anything else, and update records the caller corrects.
For example, an insurance agency's outbound agent works renewal lists from Salesforce: it greets each Contact by name, answers policy questions from the Account record, creates a Lead when a referral comes up, and every conversation lands on the timeline as a Task.
## Prerequisites
* A Salesforce edition with API access: Enterprise, Unlimited, Developer, or Performance. Professional needs Salesforce's paid API add-on; Essentials has no API access at all.
* **System Administrator** permissions in Salesforce, or a role that can create External Client Apps.
* A Salesforce user to run the integration as. Use a dedicated integration user rather than a person's account, so the connection doesn't break when someone changes roles or leaves.
Video walkthrough: connecting Salesforce and setting up contact sync end to end.
## Step 1: Create an External Client App
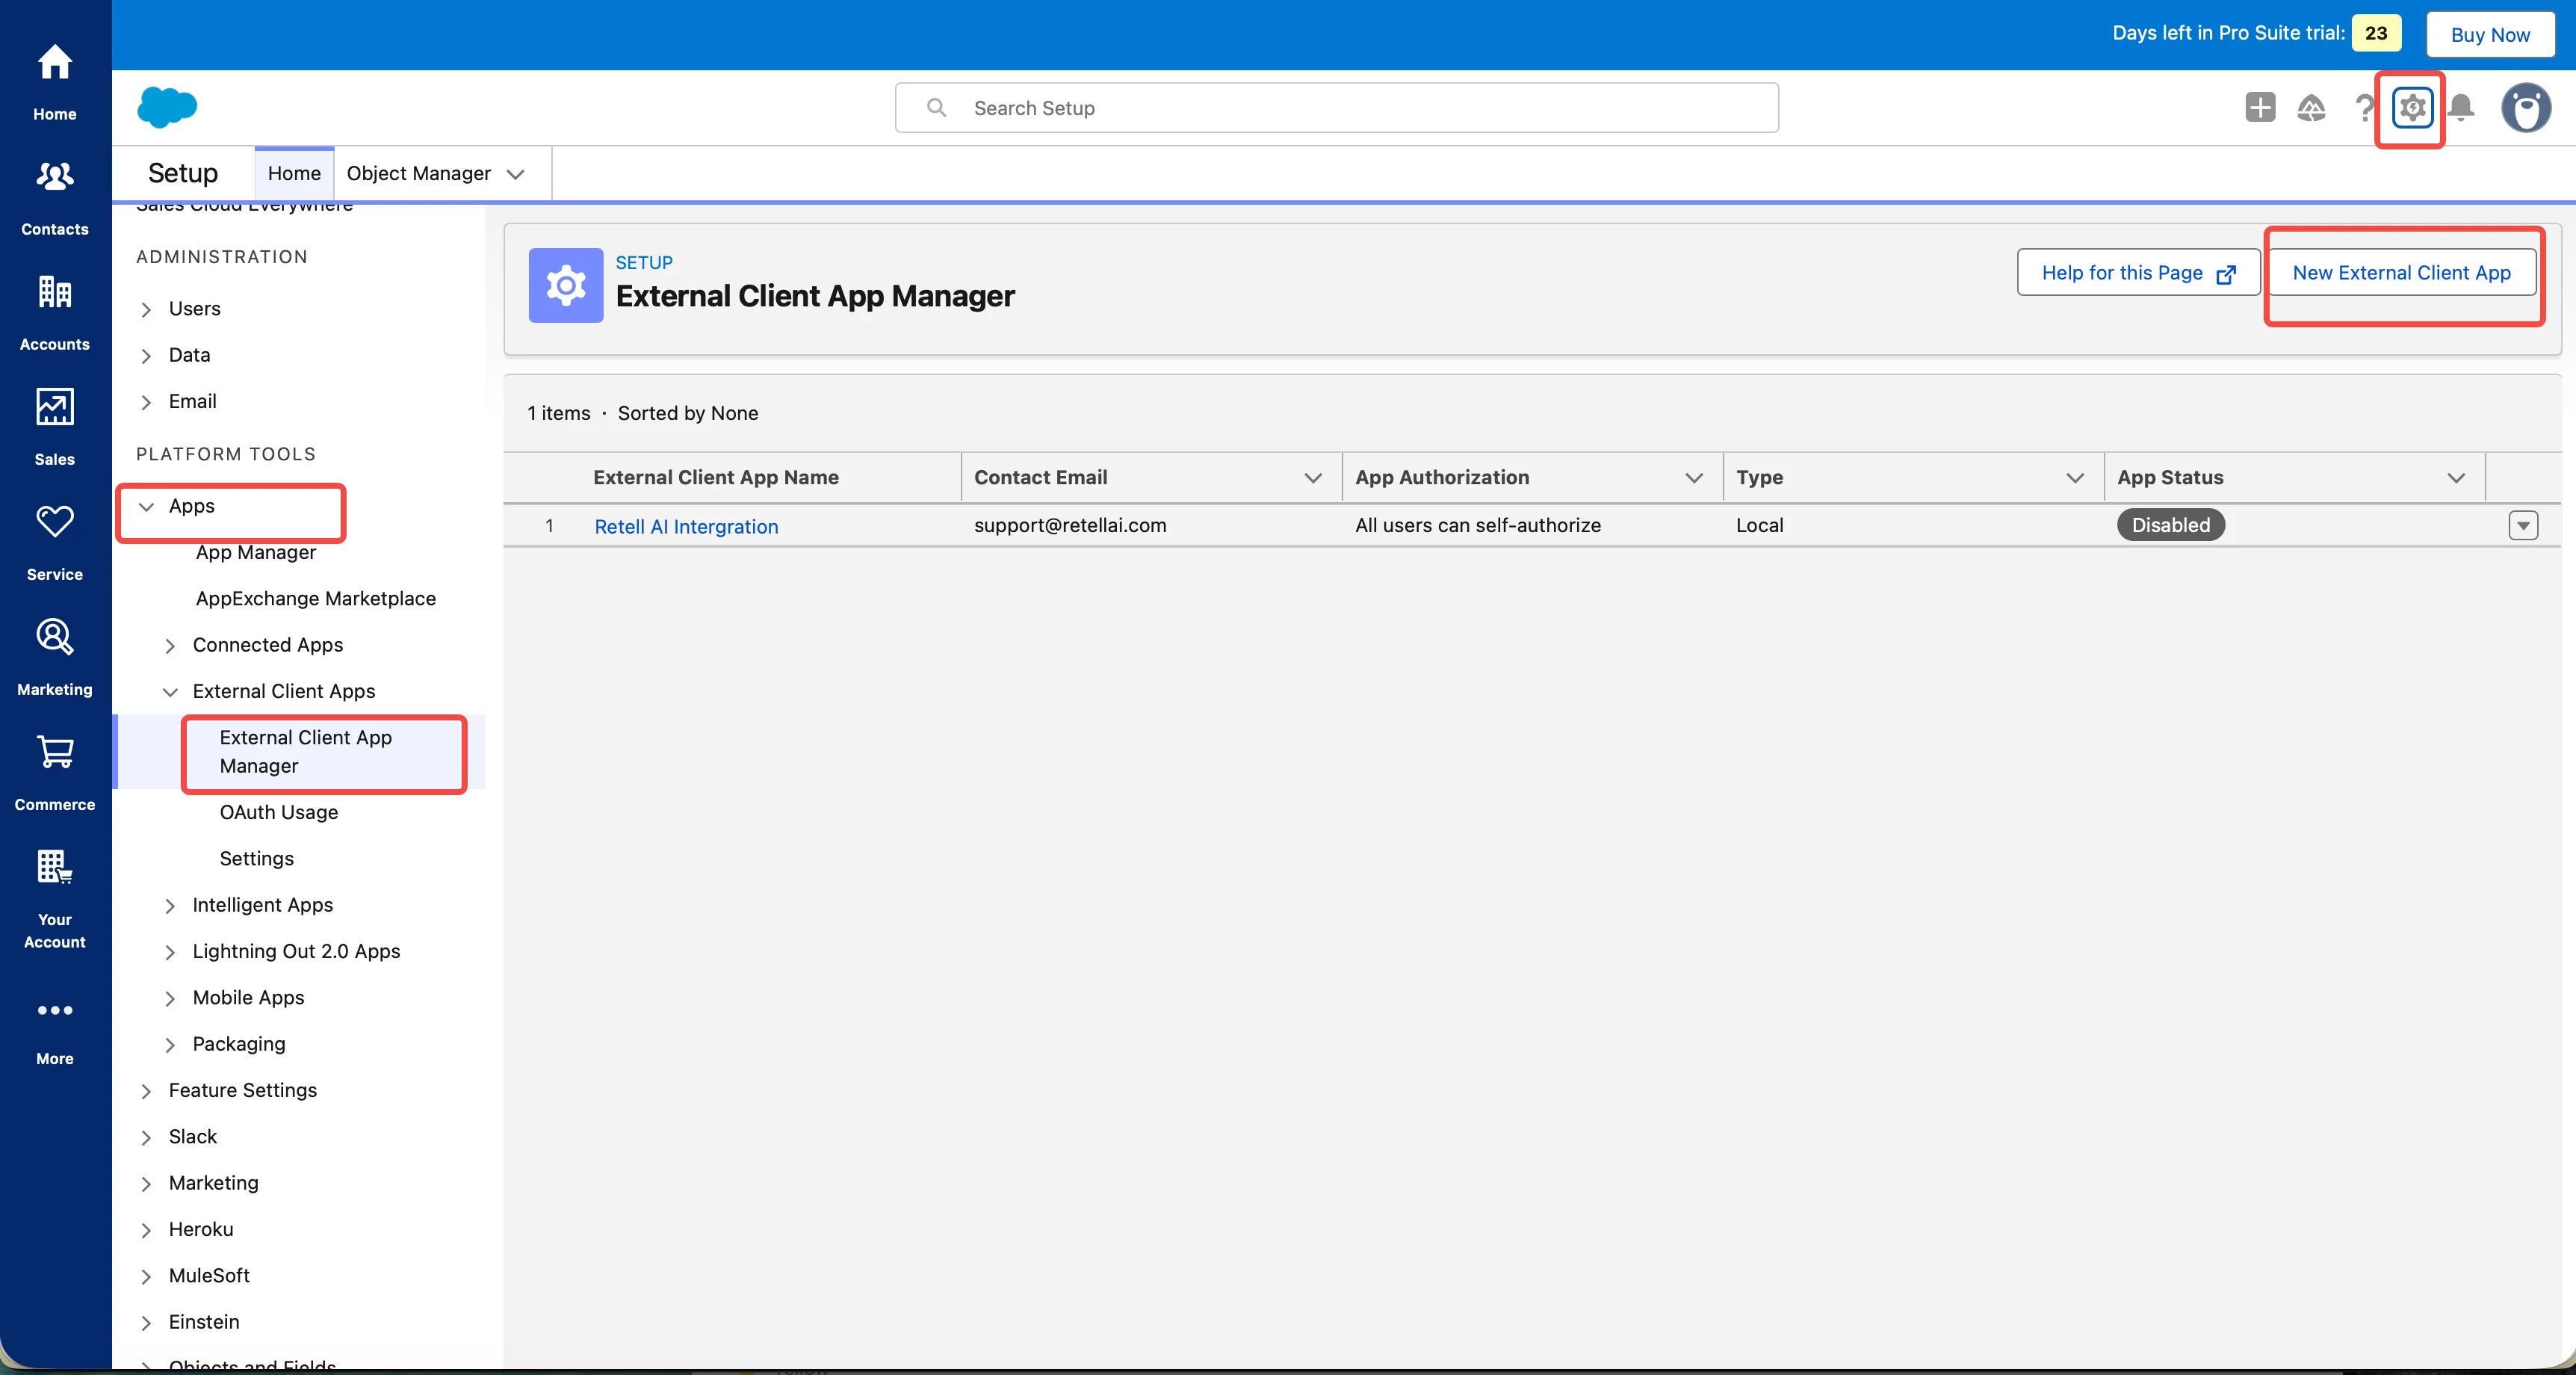
Log in to Salesforce as an administrator. Click the **gear icon** in the top-right corner, then select **Setup**.
In the left sidebar under **Platform Tools**, go to **Apps > External Client Apps > External Client App Manager**. Click **New External Client App** in the top-right corner.
**External Client Apps** replace the older **Connected Apps** for new integrations. If your org still creates apps under **App Manager > New Connected App**, the field names are the same but the screens are laid out differently, and the client credentials setting lives under **Manage > Edit Policies** instead of the Policies tab.
Under **Basic Information**, enter:
* **External Client App Name** — a descriptive name, for example `Retell AI`.
* **API Name** — auto-filled from the name; leave it as is.
* **Contact Email** — your admin email address.
Leave **Distribution State** set to `Local`. The app only needs to work inside your own org.
## Step 2: Enable OAuth and the client credentials flow
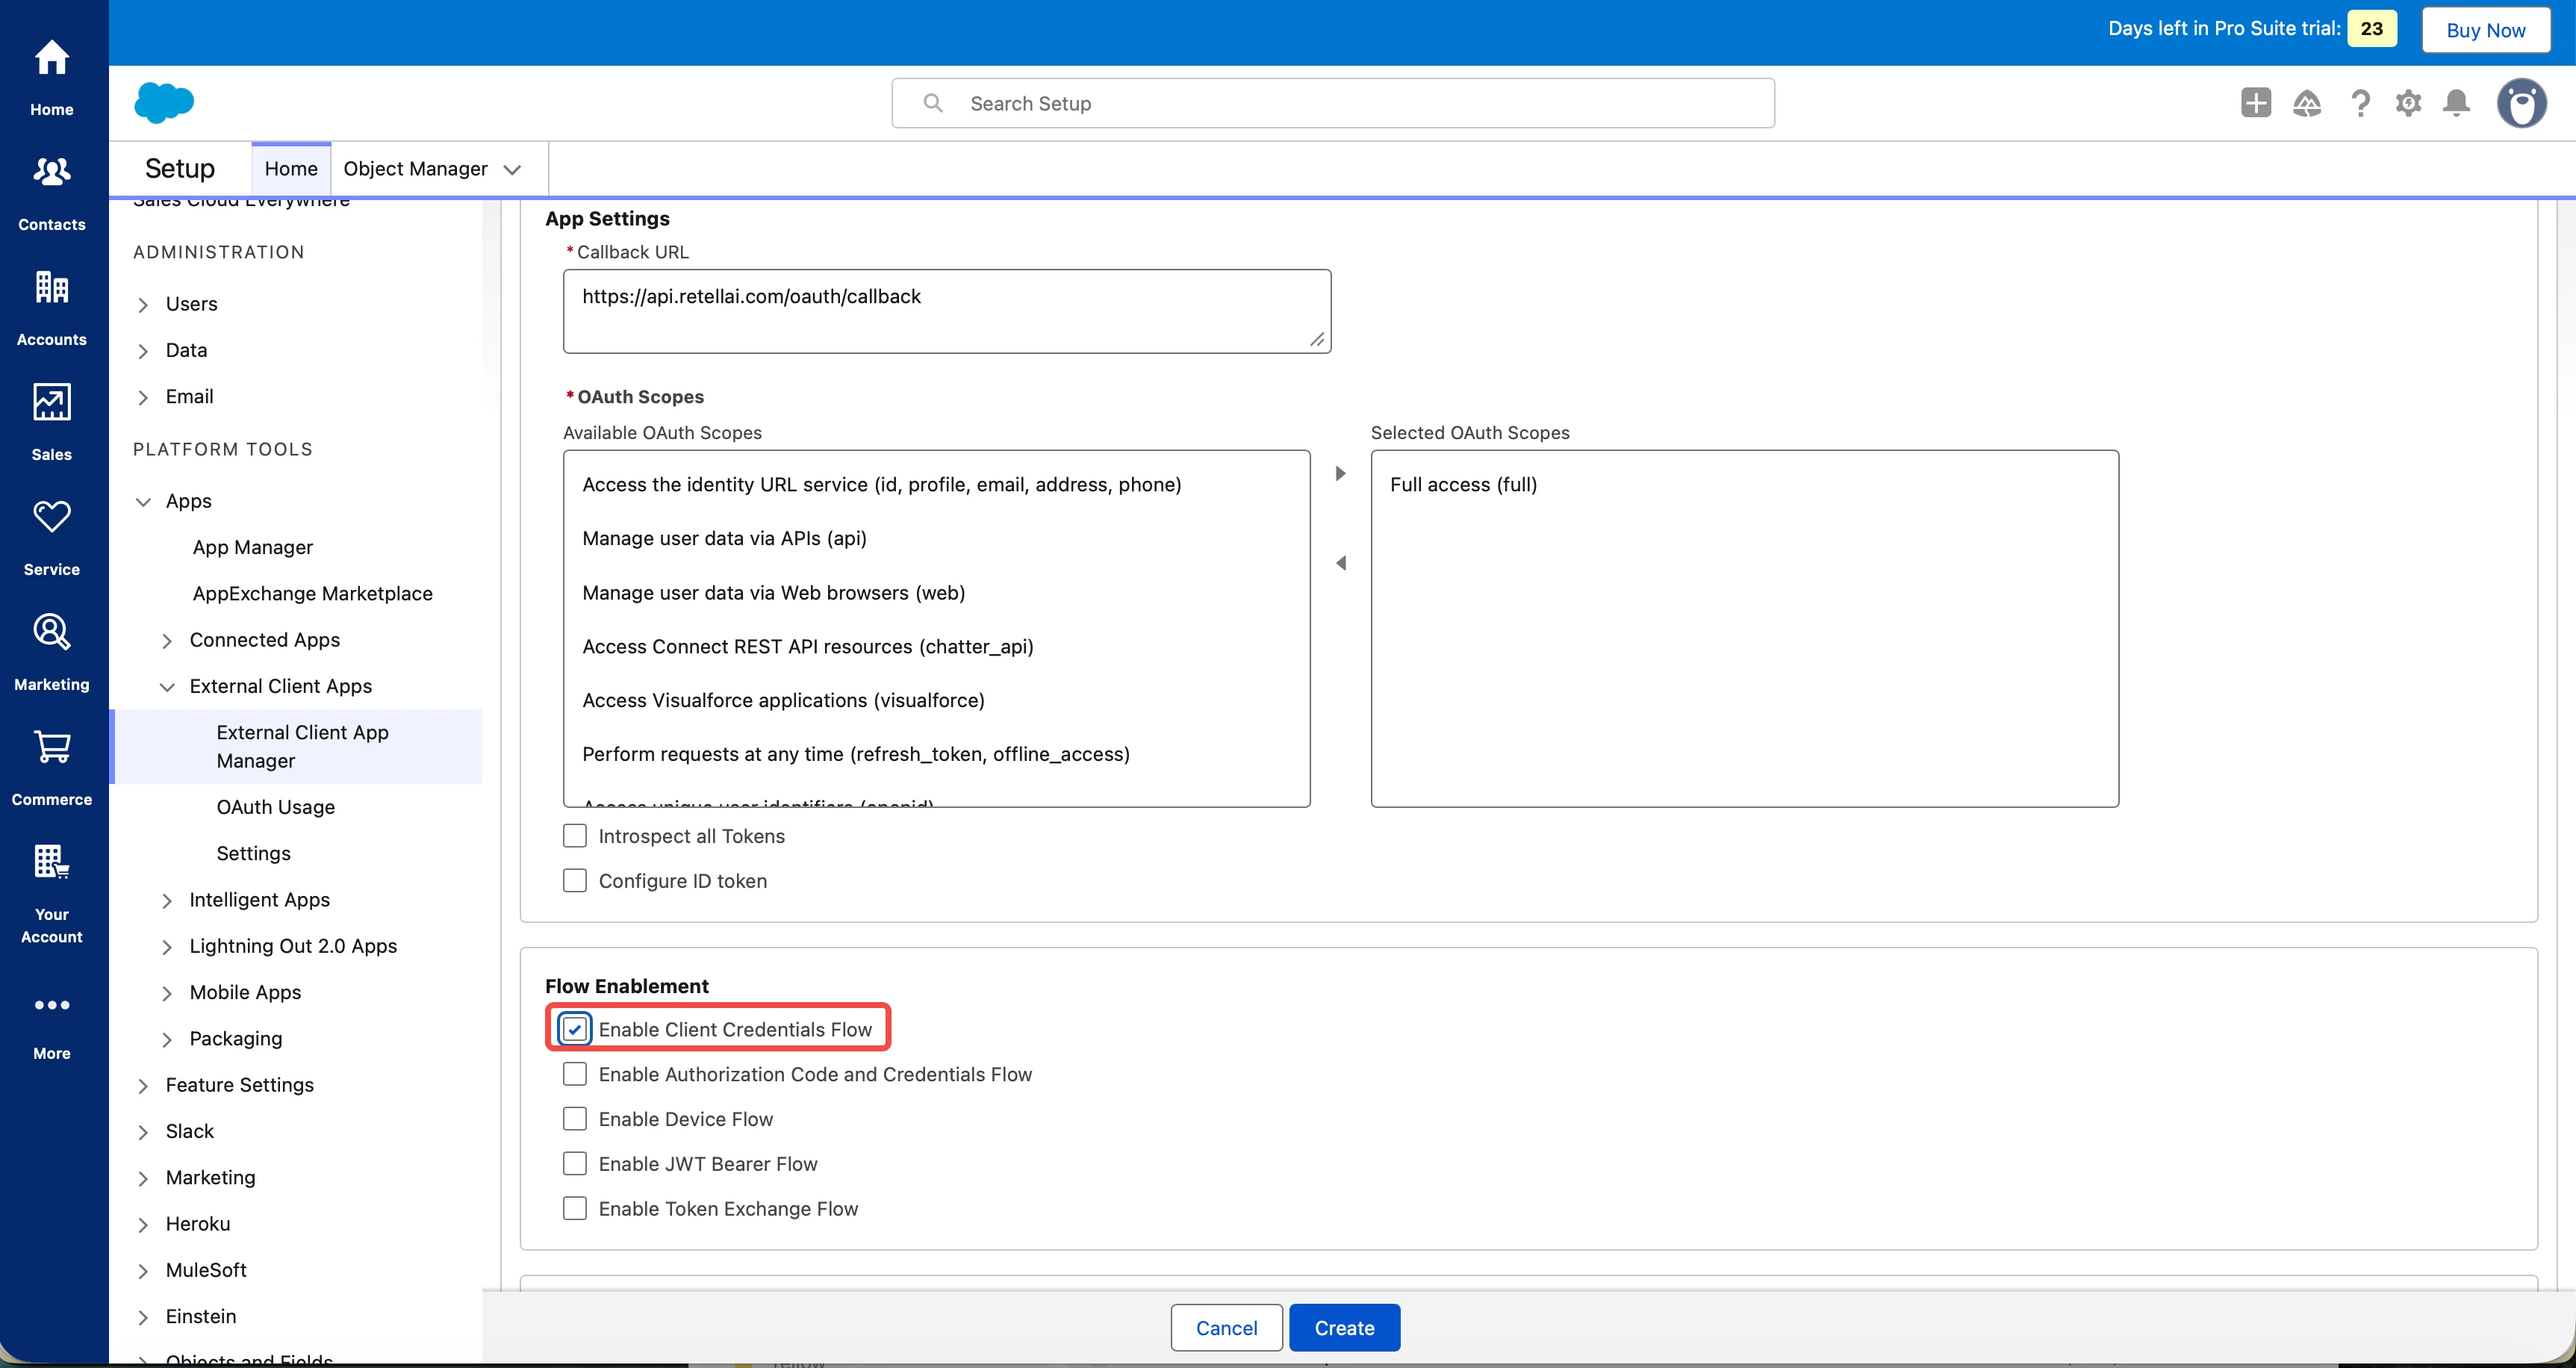
Still on the creation screen, expand **API (Enable OAuth Settings)** and turn OAuth on. This reveals the **App Settings** fields below.
Enter this **Callback URL**:
```
https://api.retellai.com/oauth-callback/salesforce
```
The client credentials flow never redirects a browser, so this value is never used. Salesforce requires the field regardless, and any valid HTTPS URL is accepted.
Move these from **Available OAuth Scopes** to **Selected OAuth Scopes**:
* **Manage user data via APIs (api)** — the only scope Retell requires. It covers every REST and SOQL call Retell makes.
* **Perform requests at any time (refresh\_token, offline\_access)** — optional. The client credentials flow doesn't issue refresh tokens, so this changes nothing for Retell, but it's harmless if your org adds it by default.
Don't select **Full access (full)** alone. The client credentials flow filters `full` out of the tokens it issues, and since Salesforce's Winter '26 release, a token request whose selected scopes are all unsupported is rejected with `invalid_grant: no valid scopes defined`.
Under **Flow Enablement**, check **Enable Client Credentials Flow**. This is the setting that lets Retell authenticate without an interactive login. Leave the other flows unchecked.
Click **Create**.
A new External Client App can take up to 30 minutes to become available (Salesforce cites 2 to 10 minutes for most apps). If connecting in Retell fails right after you create the app, wait and try again before assuming the credentials are wrong.
## Step 3: Copy the consumer key and secret
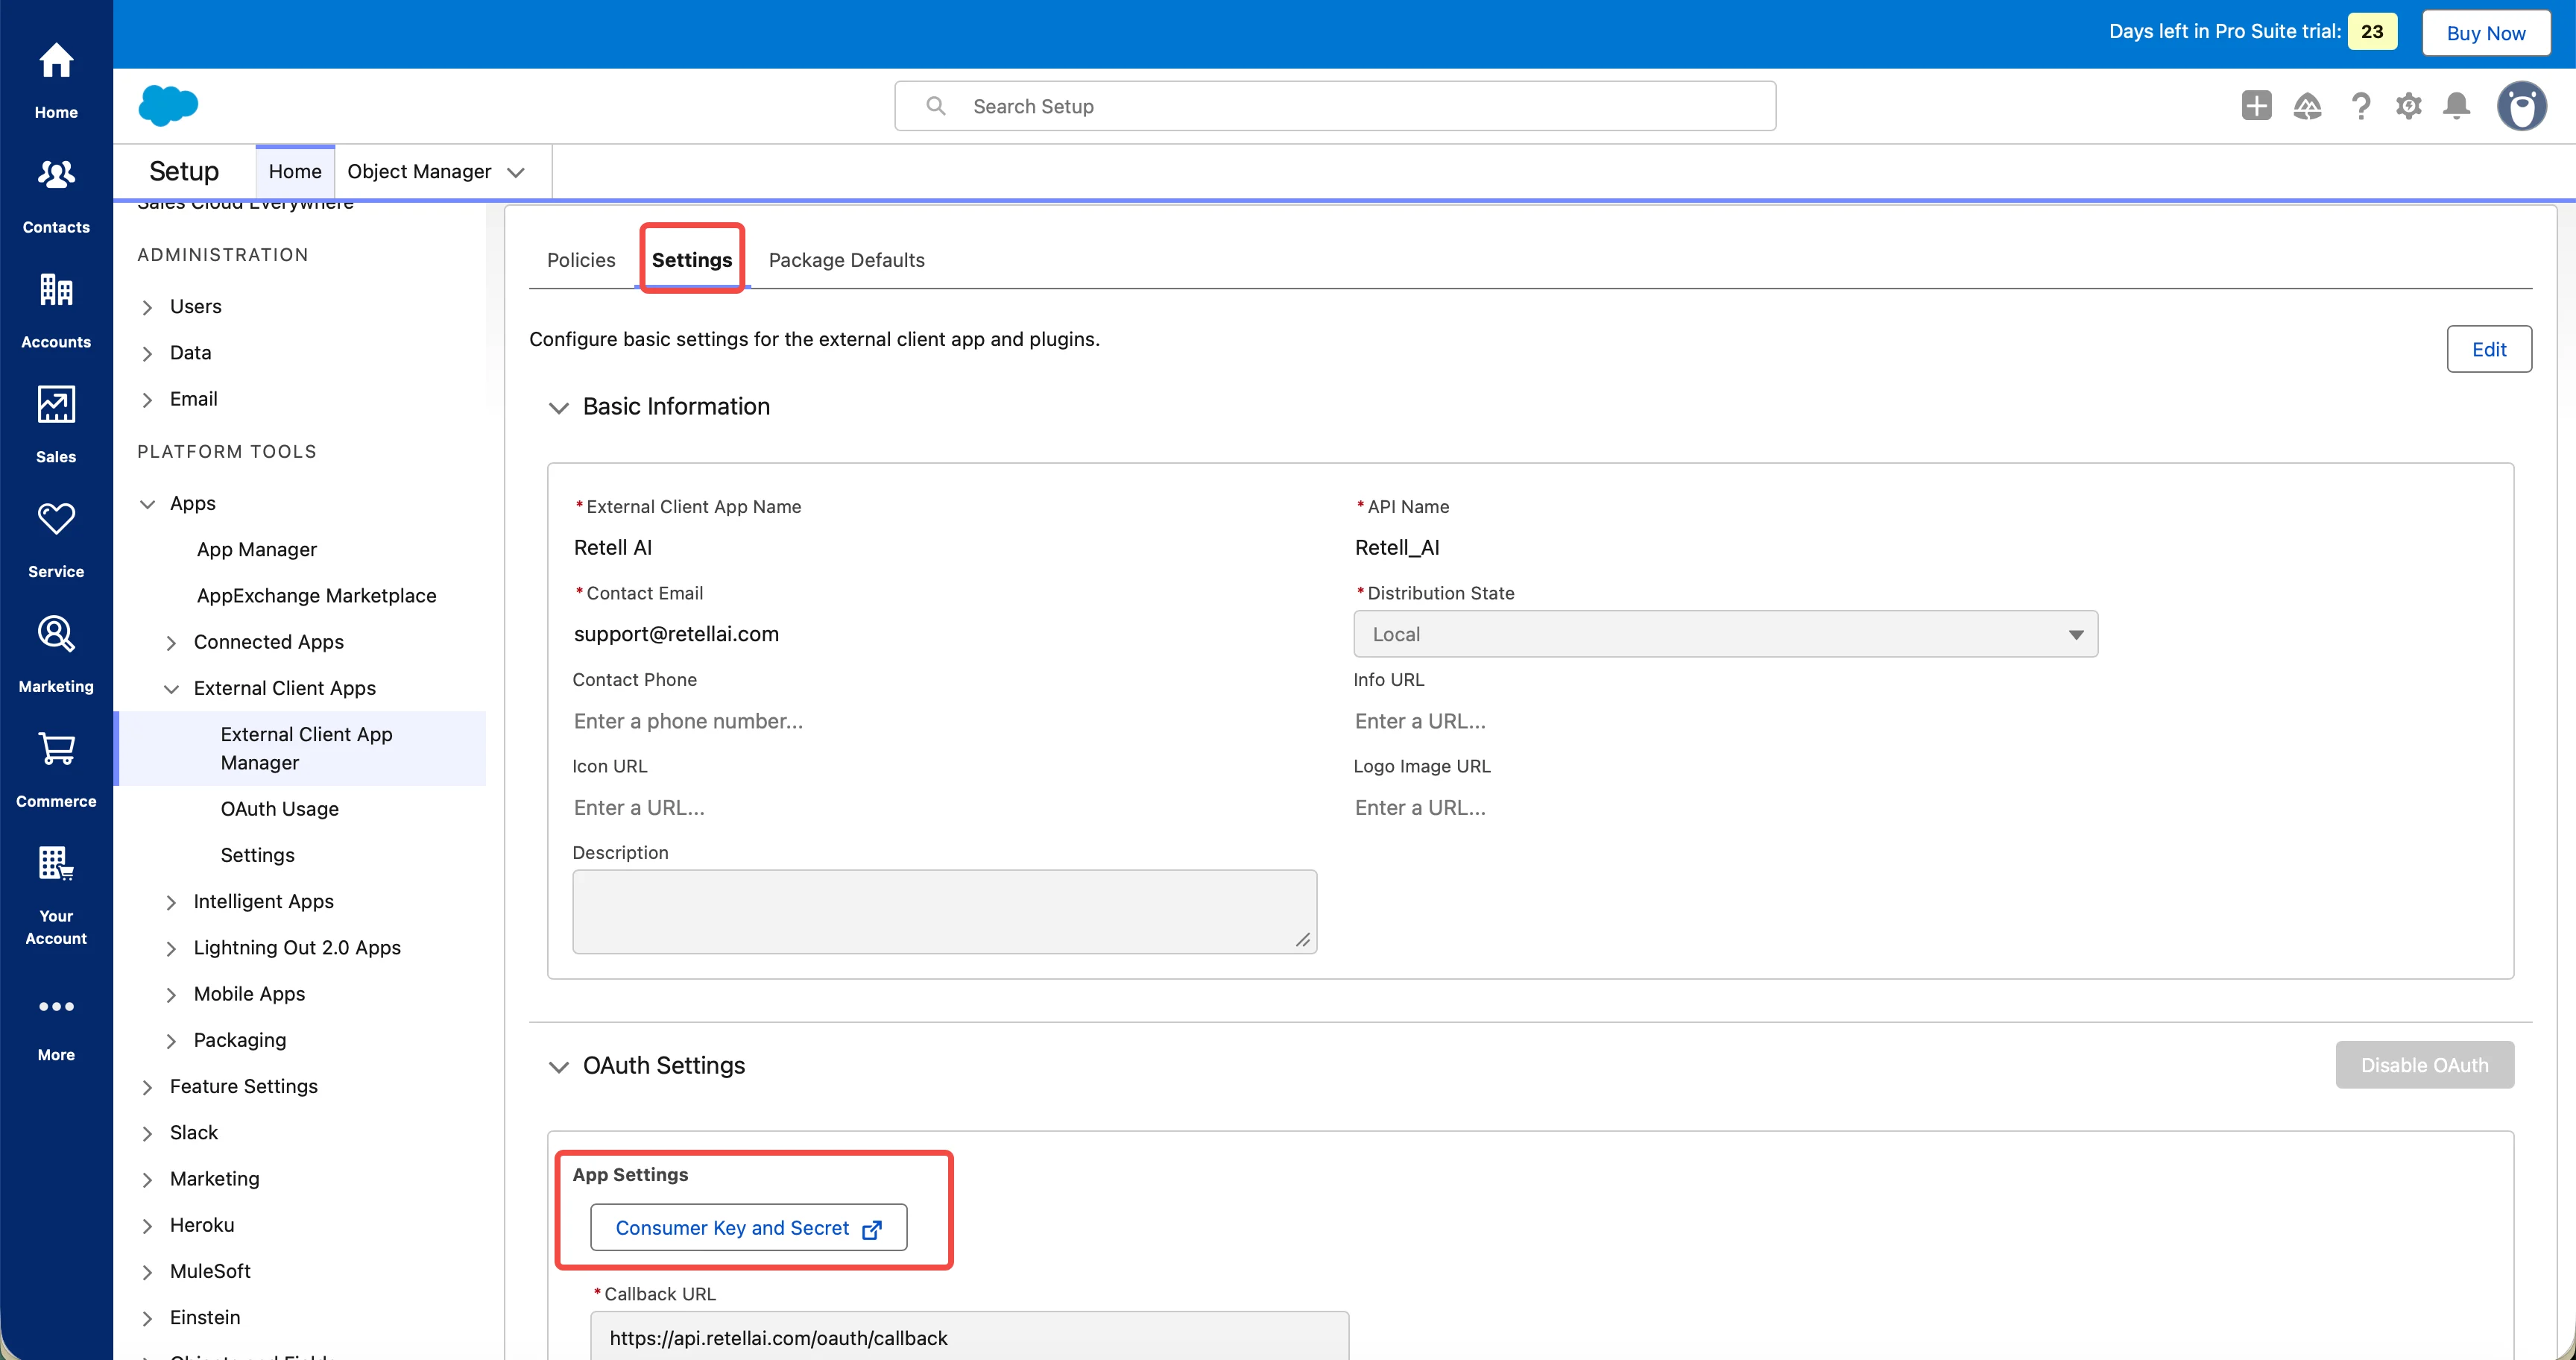
From the External Client App Manager, open the app you just created and select the **Settings** tab. Expand **OAuth Settings**, then under **App Settings** click **Consumer Key and Secret**.
Salesforce may ask you to verify your identity with a code sent to your email before showing the credentials.
Copy and securely store:
* **Consumer Key** — Retell's **Client ID**.
* **Consumer Secret** — Retell's **Client Secret**.
Treat the consumer secret like a password. Don't share it in plaintext or commit it to source control. Retell encrypts it at rest and never returns it once saved.
## Step 4: Set the Run As user
The client credentials flow has no logged-in user, so Salesforce needs to know whose permissions to apply. Every read and write Retell makes runs as this user.
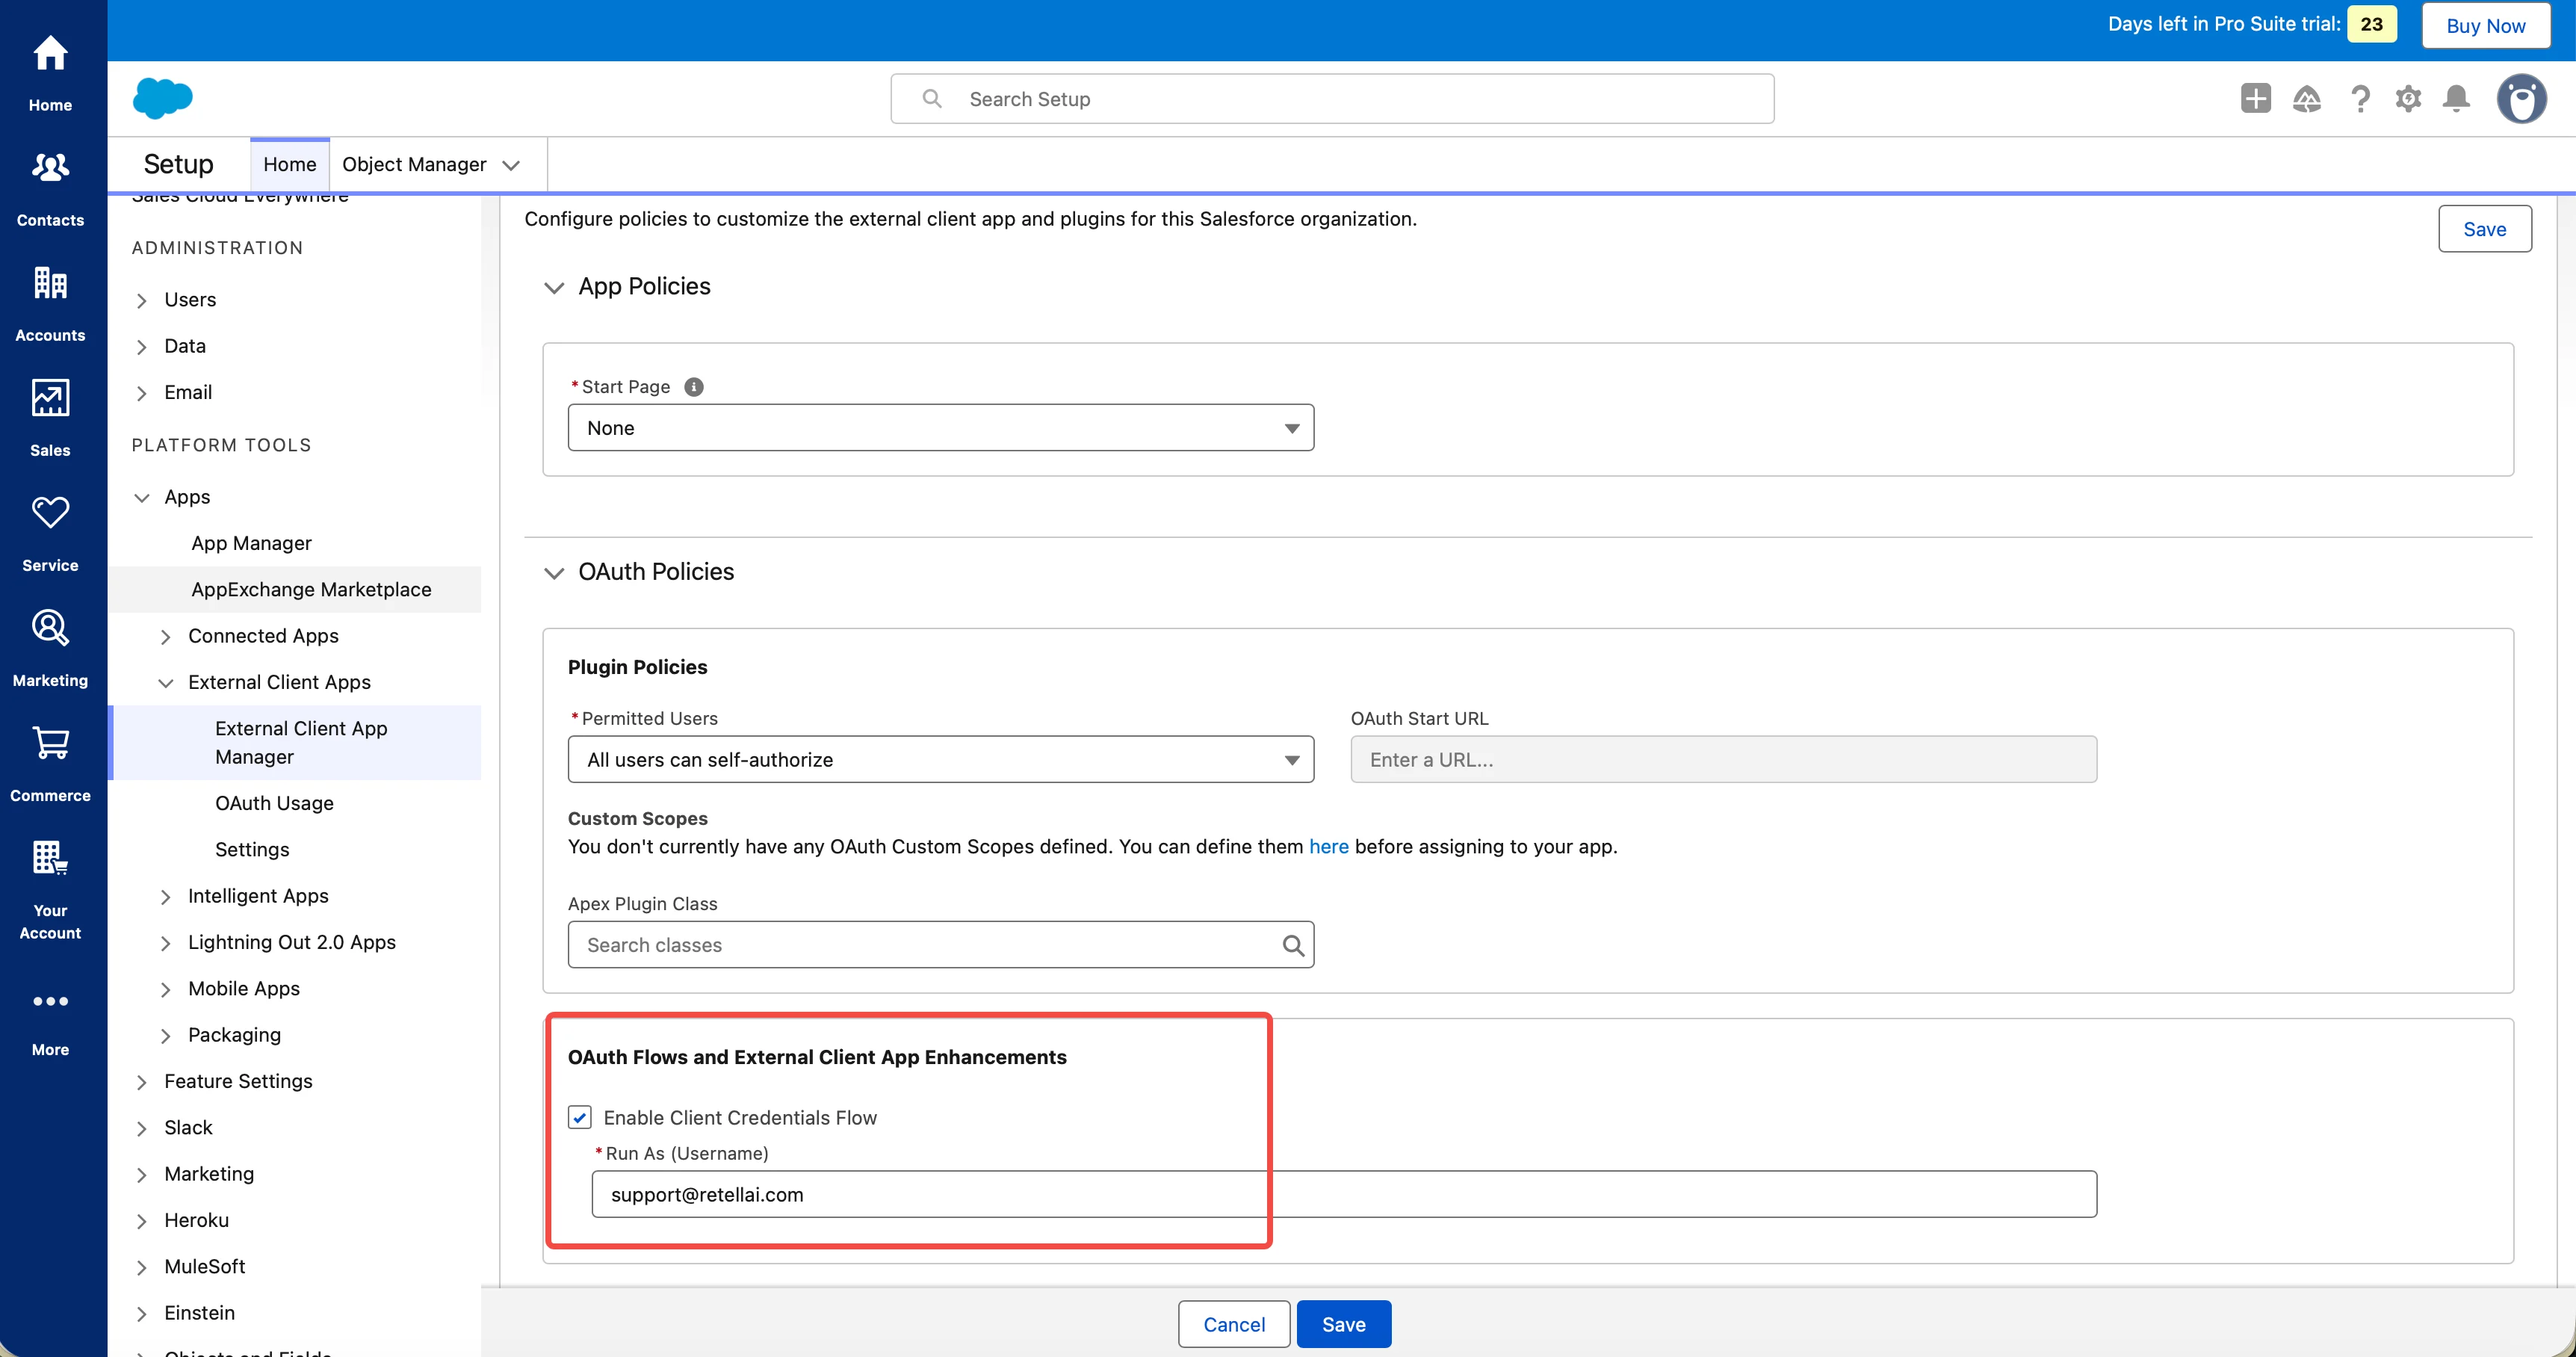
On the app's detail page, select the **Policies** tab and click **Edit**.
Expand **OAuth Policies** and find **OAuth Flows and External Client App Enhancements**. Check **Enable Client Credentials Flow**, then enter your integration user's username in **Run As (Username)**.
Enter the user's **Username**, not their email address. They're separate fields, and because a username has to be unique across every Salesforce org, they often differ. A sandbox, for example, appends the sandbox name, so `you@acme.com` becomes `you@acme.com.dev`. Copy the exact value from the **Username** column under **Setup > Users > Users**.
You check **Enable Client Credentials Flow** in two places, and both are required. The checkbox at creation time turns the flow on for the app; this one binds it to a running user. Without a Run As user, token requests fail even though the flow looks enabled.
Every read and write Retell makes is checked against the Run As user's profile and permission sets, so grant only what you'll use:
* **API Enabled** on the user's profile or a permission set. Without it, every API call is refused.
* **Read** on Contact and on every field you plan to import.
* **Edit** on Contact and on every field you plan to write back, if you enable outbound sync.
* **Create** on Task, if you enable activity logging or the **Create Task** tool.
* For the [integration tools](/integrations/salesforce-functions) you plan to use: **Read** on Lead, Account, Opportunity, Case, and User; **Edit** on Contact, Lead, and Account for the update tools; **Create** on Contact and Lead for the create tools; **Read** on every object a **Query Records** SOQL query touches; and the same permissions on any custom object you configure a tool for. Creating a Note needs **Edit** on the record it attaches to, since Notes take their access from the parent record.
A missing object or field permission doesn't break the connection. It makes that field silently fail to sync, or that one tool fail, which is harder to spot, so check the profile or permission set before you rely on a mapping.
Click **Save**.
## Step 5: Connect Salesforce in Retell
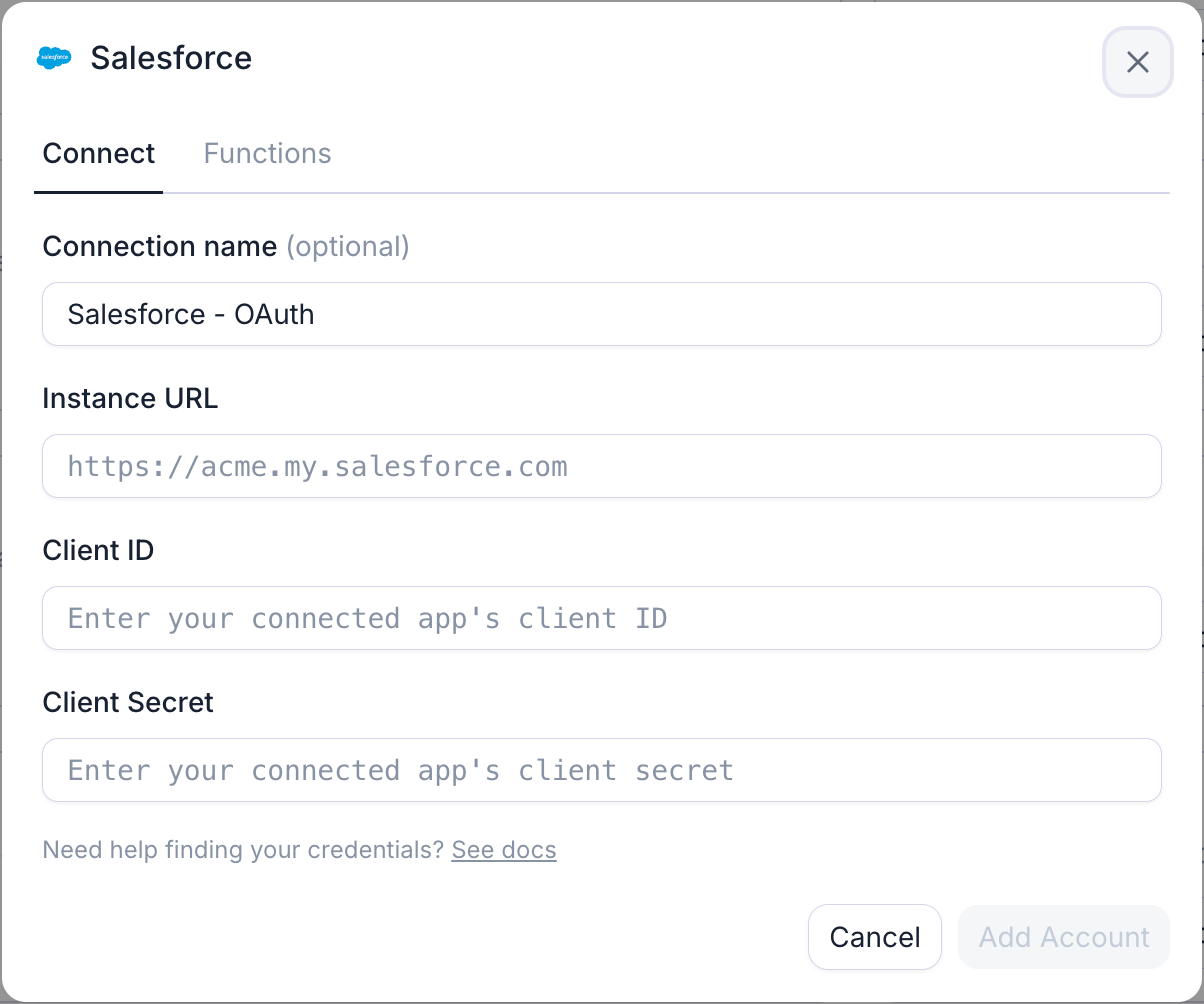
In the Retell Dashboard, open **Integrations**, select the **Available** tab, find **Salesforce**, and click **Connect** (**Add Account** if a connection already exists).
Fill in the fields:
| Field | Value |
| ------------------- | ----------------------------------------------------------------- |
| **Connection name** | Alias for this connection; prefilled with `Salesforce - OAuth`. |
| **Instance URL** | Your My Domain URL, for example `https://acme.my.salesforce.com`. |
| **Client ID** | The **Consumer Key** from Step 3. |
| **Client Secret** | The **Consumer Secret** from Step 3. |
The instance URL has to be your My Domain URL in the form `https://.my.salesforce.com`, lowercase and with no path; a trailing slash is trimmed for you. A Lightning URL like `https://acme.lightning.force.com` is rejected with `Instance URL must be in the format https://.my.salesforce.com`. Sandbox domains such as `https://acme--dev.sandbox.my.salesforce.com` are accepted.
Click **Connect** (**Add Account** if a connection already exists). Retell creates the connection and immediately tests it against the Salesforce API.
On success the dialog reports the connection as verified and offers **Set up contact sync**. On failure it shows Salesforce's own error and re-enables the fields so you can correct them.
On the **Connected** tab, the Salesforce connection shows as connected. See [Salesforce contact sync](/integrations/salesforce-contact-sync) to import your Contacts and log conversations as Tasks, or start using [agent functions](/integrations/salesforce-functions) right away.
## Troubleshooting
Give a newly created External Client App up to 30 minutes to become available, then retry. If it still fails, confirm **Enable Client Credentials Flow** is checked on both the app's creation settings and its Policies tab, and that **Run As (Username)** is set.
Find the correct value in Salesforce under **Setup > Company Settings > My Domain**, then check it against the format above. Lightning URLs (`.lightning.force.com`) and bare `.salesforce.com` URLs are rejected.
Retell flags a connection as errored when Salesforce rejects the credentials: an HTTP 401, or Salesforce's `INVALID_SESSION_ID`. The usual causes are a rotated consumer secret, a deactivated Run As user, or the app being deleted or disabled in Salesforce. Reconnect with current credentials.
If your org enforces login IP ranges on the Run As user's profile, or the app's OAuth policies enforce IP restrictions, Salesforce refuses Retell's calls because they come from cloud IPs. On the app's **Policies** tab, set **IP Relaxation** to **Relax IP restrictions**, or exempt the integration user's profile from login IP ranges.
On the **Connected** tab, open the connection's settings. The saved secret shows masked; paste the new one over it (re-enter the Client ID too if it changed) and click **Reconnect**. Retell verifies the new credentials before saving, and your field mappings and synced contacts are untouched.
## FAQ
You can add multiple connections, but only one CRM connection in your workspace can drive [contact sync](/integrations/salesforce-contact-sync) at a time, across every provider. The **Contact sync** toggle in a connection's settings decides which one; turning it on for one connection takes sync over from the previous one.
## Next steps
Import your Contacts, write analysis results back, and log conversations as Tasks.
Look up the caller, read opportunities and cases, create contacts and leads, and run SOQL queries mid-conversation.
See every provider Retell connects to and how integration tools work.
How contact sync, analysis mapping, and activity logging work across CRM providers.